This TiviMate setup guide explains how the modern live streaming environment has completely shifted toward specialized player software. Cord-cutters everywhere consider the TiviMate application to be the most advanced media controller available on modern streaming hardware. Its flawless user layout transforms basic server connections into a sleek premium cable experience.
It is absolutely crucial to understand one foundational aspect of this software application. TiviMate functions solely as an interactive media engine and contains zero integrated entertainment or playlist libraries. Users must bring their own active subscriptions from outside entertainment providers to populate the interactive digital environment.
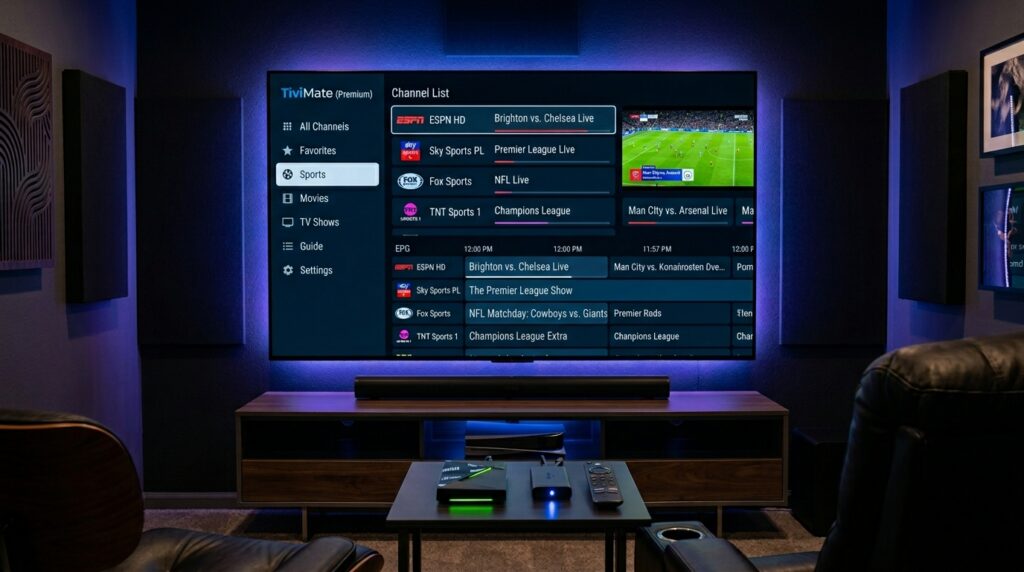
Selecting this particular interface provides immediate access to an incredibly optimized live television viewing system. The platform effortlessly handles massive database directories without causing sluggish system response or interface crashes. It bridges the technical gap between modern independent streaming protocols and traditional high-end television guide layouts.
Prerequisites: What You Need Before Starting
Setting up this media engine requires specific hardware and software components to work correctly. You will need an authorized Android-based system like a Fire TV Stick, Nvidia Shield, or Google TV environment. The platform does not natively operate on systems running restrictive operating networks like Apple or Roku platforms.
A highly stable and reliable broadband network connection serves as your streaming backbone. We recommend a sustained connection of at least 25 Mbps to prevent low-resolution presentation or buffering. High-definition feeds and 4K broadcasts demand consistent digital transmission speeds to maintain steady image delivery.
Finally, you must acquire active access credentials from a reputable digital media provider. These details usually arrive in the form of an M3U digital line or specialized server connection keys. Having these connection components prepared beforehand ensures a completely seamless, hassle-free initial platform configuration.
Comprehensive Device Installation Steps
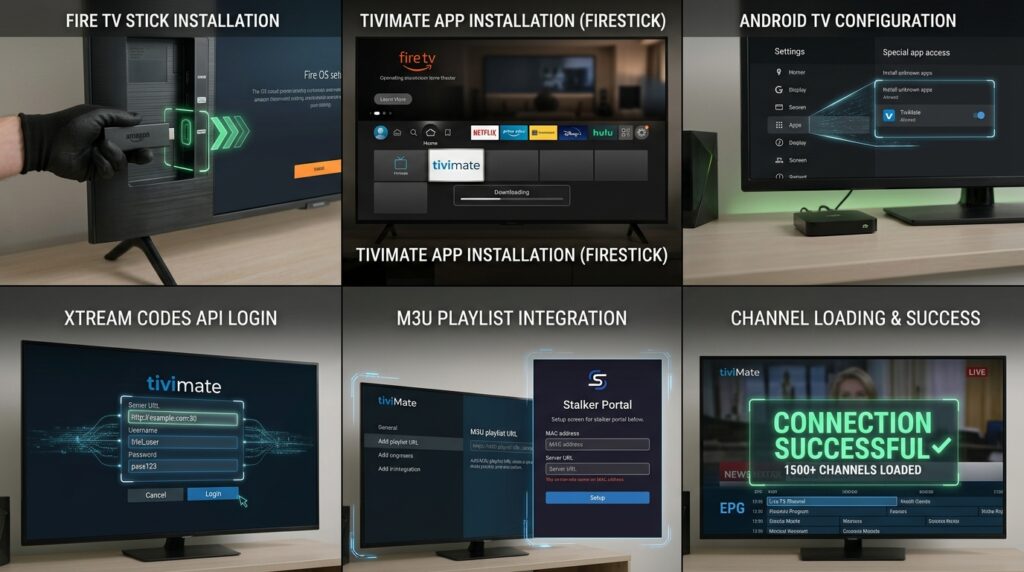
How to Install TiviMate on Amazon Firestick (Sideloading Method)
Setting up software outside the official Amazon marketplace requires adjusting your digital device configuration properties first. Navigate directly into the system settings panel on your Amazon Fire TV display interface. Click the system device tab and locate your specific developer option settings.
If the developer settings are invisible, click the About button exactly seven times continuously. This action instantly unlocks the hidden configuration options necessary for third-party program integration. Turn on the setting that permits installation choices from unknown external platform origins.
Open the Amazon application store to download the helper application known as Downloader. Type the specific digital download shortcode 272483 directly into the address text field box. The utility will pull the package file from the official tivimate.com/apk system storage repository.
How to Install TiviMate on Android TV and Google TV Devices
Locating the proper media control platform on standard Android setups is remarkably straightforward. Open the native Google Play store ecosystem using your standard television hardware remote control. Move your cursor directly over to the main search bar at the upper section.
Type the software title directly into the search bar to show the official utility. Click the blue installation button to let the system automatically manage the background setup. The process takes only a few moments depending entirely on your local network performance.
If regional restrictions prevent the download, a standard manual installation becomes necessary. Use an external USB drive or a network storage app to move the file over. Launch the file management tool on your television to finalize your application initialization.
Step-by-Step TiviMate Setup Guide: Adding Content
Phase 1: Configuring Your First Playlist
Integrating via Xtream Codes API (The Recommended Method)
Using the API connection framework represents the cleanest method for configuring your digital channel library. Launch your freshly initialized media player software and select the primary option to add a playlist. Choose the Xtream Codes login option from the list of available connection types.
Carefully enter the exact server address, account username, and password provided by your service. This specific text input requires absolute case-sensitive accuracy to establish a functional data connection. Pay close attention to alternating symbols and numbers while using your remote onscreen keyboard layout.
Example Xtream Codes Layout:
Server URL: http://provider-domain.xyz:8080
Username:   your_unique_user_id
Password:   your_secure_password
Once the fields are properly filled, click the processing button to initiate the primary server handshake. The application will begin indexing your live streams, video-on-demand content, and television series directories. Save the profile with a recognizable name to complete this initial connection phase.
Integrating via M3U URL or File
Alternative service architectures sometimes require using a direct M3U web link to import channels. Select the regular M3U link option inside the primary initialization menu screen. This long string contains your unique account credentials embedded inside a complex web destination address.
Typing these long strings using standard remote control inputs can sometimes feel incredibly tedious. We highly recommend utilizing a companion mobile remote application to paste the web link directly. Alternatively, you can download the configuration file directly onto local media and import it.
The platform will parse the text file to build your television channel database map. Ensure your internet connection remains totally stable during this initial synchronization routine. A interrupted download could lead to corrupted category folders or missing stream indexes.
Integrating via Stalker Portal
Certain historical subscription networks rely strictly on specialized Stalker Portal validation systems. Select this specific connection option if your media provider relies on custom hardware verification. The software will display your active virtual device MAC address on the television screen.
You must provide this unique identification number directly to your digital media service provider. They will authorize your specific software profile on their central distribution control servers. Enter the specific portal link address provided by your service operator into the field.
Click through the confirmation screens to pull the authenticated stream lists down. The system will sync with the provider database to display your authorized entertainment tiers. Your connection is now securely linked to that specific distribution source engine.
Phase 2: Electronic Program Guide (EPG) Configuration
Linking EPG Sources for Seamless TV Guides
An accurate television layout guide is absolutely essential for a premium home viewing experience. Most modern playlist files automatically configure their matching digital guide sources during initialization. If your grid displays empty program slots, manual guide source integration becomes necessary.
Navigate to the primary settings panel and open the dedicated program guide options menu. Select the option to add an internal or external guide source path. Enter the specific EPG link provided by your service provider into the address field.
EPG Sync Configuration:
- Update Interval: 24 Hours
- Sync on App Launch: Enabled
- Time Offset: 0.0 (Adjust if schedules mismatch)
The application will download the schedule data and map it against your channel list. You can assign specific time offset corrections if the show times look slightly incorrect. This ensures your guide always accurately reflects local broadcasting schedules throughout the day.
Unlocking TiviMate Premium Features
Is TiviMate Premium Worth It?
While the baseline application operates without charging fees, upgrading unlocks its true potential. The free version restricts viewers to basic single-list playback with no interface customization. Purchasing the premium version grants complete access to elite toolsets that redefine home entertainment.
Free Version Capabilities
Premium Tier Features
Single Playlist Connection
Unlimited Playlist Integrations
Basic Channel Scrolling
Advanced Custom Favorites Groups
Standard Internal Player
Multiview Screen Splitting Modes
No Grid Guide Adjustments
Full EPG Automation & Search Tools
No Cloud Backup Options
Scheduled Recording & Cloud Syncing
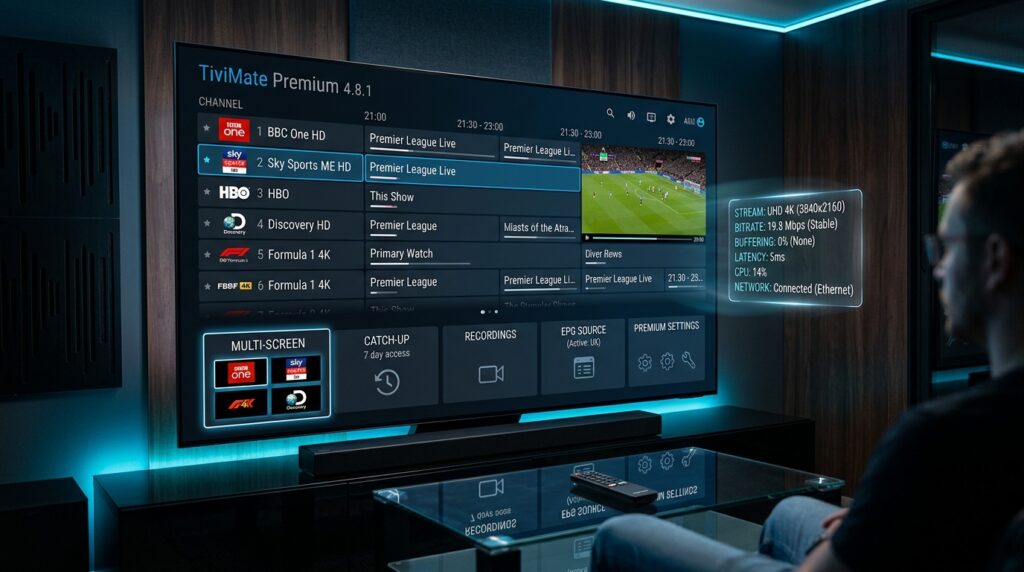
The advanced tier turns a simple utility into an absolute masterpiece of entertainment software engineering. Power users will find the multi-screen feature alone easily justifies the small financial investment. It is the perfect addition for households running premium IPTV plans.
How to Upgrade to TiviMate Premium
The TiviMate Companion App Method (For Firestick Users)
Amazon device users must follow a specific process because the Fire OS ecosystem lacks Google billing. Grab a standard Android smartphone or tablet device to begin this licensing activation sequence. Open the official Google Play storefront on that mobile device to find the companion helper.
Download the official TiviMate Companion software application onto your smartphone device. Create a brand new user profile using a valid email and a secure password combination. Choose your preferred subscription model or the lifetime licensing purchase option within the interface.
Licensing Steps for Firestick:
1. Download Companion App on Android Phone
2. Register Account & Pay via Google Play
3. Log In with Same Credentials on Firestick
Once payment finishes, return to your Amazon streaming device to complete activation. Open the player settings menu and log in with your new companion account credentials. Your device will instantly unlock the premium operational features across the entire system.
Direct Activation on Android TV
Users utilizing actual Android TV environments or official Google TV hardware have it easier. You can skip the external companion mobile device registration process entirely during setup. Navigate straight into the premium upgrade section located inside the software settings panel.
The interface will pull up your standard integrated Google account billing profile securely. Choose your preferred subscription length or the flat one-time lifetime license purchase option. Confirm the transaction details using your pre-programmed security verification code methods.
The system will update your subscription tier status instantaneously on the central licensing servers. All restricted settings panels will instantly open up for deeper custom optimization configurations. You can link multiple devices in the household under this single unified account.
Advanced Optimization and Customization
Perfecting Video and Audio Playback Settings
Achieving flawless playback requires tweaking the system processing parameters to fit your hardware capabilities. Enter the advanced playback options screen inside the comprehensive software settings menu. Locate the primary stream buffer adjustment tool to manage incoming network data streams.
Setting the buffer to medium helps stabilize feeds on average residential internet connections. If your device experiences interruptions, increasing this cushion can help maintain smooth video playback. To eliminate playback stutter, check out common xtreme hd iptv buffering solutions to optimize performance.
Recommended Playback Configuration:
- Video Decoder: Hardware (Always priority)
- Audio Decoder: Hardware
- Auto-Frame Rate (AFR): Enabled
- Buffer Size: Medium or Large
Turn on the system auto-frame rate option to match your display refresh rate with the original broadcast. This elegant feature removes micro-stuttering issues during fast-paced live sporting events or action cinema. Ensure hardware decoding remains active to leverage your streaming processor’s native power.
Interface Personalization and Channel Management
The true brilliance of this software lies in its extensive visual design adjustments. Long-press the selection button on any active stream to pull up the options panel. Select the star icon to instantly send that specific program into your master favorites directory.
You can create entirely new custom category groups to organize your massive channel lists. This helps you filter out thousands of international options you never intend to watch. It simplifies navigation, making it easy to jump straight into your favorite programming blocks.
How to Organize Channels:
1. Hold Select on any active channel
2. Click "Add to Favorites" or "Manage Groups"
3. Hide unwanted global categories to clean up the guide
If a particular file format encounters playback issues, you can integrate external players. Linking external utilities like VLC or MX Player provides excellent codec support for rare video formats. This ensures your media player can handle any specialized video-on-demand files smoothly.
Essential Security, Privacy, and Maintenance
Why a VPN is Essential for This TiviMate Setup Guide
Utilizing a premium virtual private network remains an absolute necessity for modern streaming enthusiasts. Internet service providers frequently throttle high-bandwidth data streams when they detect continuous live media traffic. A secure encryption tunnel keeps your online activity private from local network providers.
Furthermore, a data tunnel protects your personal information from potential security risks on public networks. It allows you to bypass regional geo-blocks enforced by international media companies. This ensures your premium IPTV subscription performs at peak efficiency without artificial network slowdowns.
“A quality encryption layout preserves your connection speeds while preventing local network operators from monitoring your residential entertainment habits.”
Backup and Restore Protocols
Investing hours into organizing your custom channel lists means protecting that configuration data is vital. Navigate straight into the general settings directory inside the main dashboard panel. Select the data export feature to create a complete snapshot of your current software layout.
Save this backup file onto your local device storage or an attached network drive. If you ever upgrade your streaming hardware, you can instantly restore your exact layout. This simple maintenance step saves you from having to manually sort thousands of channels all over again.
Troubleshooting & Google Featured Snippet FAQs
Why is my TiviMate setup guide not loading channels?
If channels fail to load during setup, it is usually due to a typo in the server URL, username, or password. Ensure your internet connection is active, temporarily disable your VPN during initial sync, and verify with your provider that your account line is currently active.
How do I fix the “No Information” error on the TV Guide?
Clear the application cache files completely through your device’s primary software management menu. Return to the guide settings inside the player and force a manual data update. If the error persists, verify that your provider’s EPG source web link is still active and correct.
Can I use TiviMate on an Apple TV, iOS, or Roku device?
No, the software application is written exclusively for Android and Fire OS architecture frameworks. It cannot be installed or configured on Apple or Roku television hardware environments. Users on those platforms must look for alternative third-party media players.
How do I configure external storage for recording live TV shows?
Connect a compatible USB storage drive formatted to the FAT32 filesystem directly to your device. Go to the app settings, select the recording path option, and choose your external drive directory. Ensure the storage device has ample free space to hold large, high-definition video recordings.
What should I do if TiviMate keeps buffering or freezing?
First, restart your internet routing hardware to clear out temporary connection issues. Increase the internal stream buffer size within the app’s advanced playback settings menu. For more comprehensive solutions, check out our guide on fixing xtreme hd iptv keeps buffering issues.
Conclusion & Next Steps
Configuring this exceptional media engine completely revolutionizes how you consume live television and streaming entertainment. Following this systematic layout turns a complex playlist into an organized, highly responsive digital cable environment. Take the time to fine-tune your playback settings and build clean, custom favorites lists.
Remember to export your data layout configurations periodically to protect your personalized setup from unexpected system wipes. Keep your media player updated to the latest stable software release to enjoy new features as they roll out. Now, sit back, relax, and enjoy an unparalleled, premium home viewing experience.